Wednesday, October 3, 2012
The Lost Shoe
I had a lesson in patience while on our drive back from Washington. I was driving with my friend and her 3 kids and with my 2 kids. The drive was going pretty good and we stopped at a park in Pendleton, OR for lunch. The kids had a good time running around and getting some wiggles out. So we started packing up and I told Olivia to go and get in the car. She decided she wasn't done playing yet and ran back to the playground. I was a little frustrated because if anyone knows me, when driving I don't really like to stop, I just want to get to my destination as fast as possible. So I ran after Olivia and told her to get in the car. She started crying and freaking out because there was sand in her shoe (and I thought, well if you listened to me the first time this wouldn't have happened). I told her to deal with it and go to the car. She started freaking out more so I ripped her shoes off and told her to walk barefoot in the grass. Then she started crying more so I threw her over my shoulder and carried her to the car with her screaming the whole way. I chucked her shoes in the car, put Olivia in her carseat and she fought me the whole time I was trying to buckle her. At this point I was so done with her! I jumped in the car and drove away. When we reached Parma, ID to get gas I looked for Olivia's super cute Keen sandals...but only one was found. I looked all through the car, the other shoe was nowhere to be found. Then I remembered that at the last stop I chucked her shoes in the car not paying attention to if both of them were in the car when we left. I realized that I had been stupid and silly. It was naptime, she didn't want to get back in the car, and she had sand in her shoe. Why had I been so impatient with her. Why hadn't I just calmly picked her up, taken off her shoes, dumped out the sand, placed her shoes back on her feet, and walked with her back to the car. It would have added a minute, tops, to our drive and I would still have those adorable little shoes. So now I keep the one shoe that I have on a shelf in my house to remind me to be more patient, and it has worked. When Olivia starts throwing a fit and I start getting frustrated with her, I see the shoe and I calm down and try to see the "crisis" through her eyes and stay calm.
Monday, April 23, 2012
DIY Kids Puzzle

I was playing with the puzzles with Olivia one day and thought to myself, "You know, these wouldn't be that hard to make." And I was right! It might be a little hard if you don't have tools, but I do : ) So if you are a little handy, here's how I did it.
1/4" wood. I used a wood panel I found at Home Depot 2'x4' for about $7
spray adhesive
wood glue
Table saw/ Jig saw/ Circular saw - any kind of saw to cut your wood panel into 2 pieces
scroll saw
drill
sandpaper
Mod Podge
Step 1:
Make your photo you want to use and print 2 copies (I did one black&white, why waste colored ink). I used Paint.net, it's a free program you can download. Or you can use Photoshop, or if you don't want to mess with editing, you could just use a family photo instead of making a new scene. (For me this was the longest step, finding the pictures and putting it all together)
Step 2:
Cut your panel to size. I made an 8"x10.5" photo, and then left about a 3/4" around the edge. So cut 2 pieces that are the same size. I used a table saw, but if you don't have one you can use whatever saw you can find to cut your pieces out

Spray the spray adhesive onto the back of your picture, and stick it in the middle of one of your panels.

Using a drill bit that is just bigger than your scroll saw blade, drill a hole next to every puzzle piece you want to cut out

Step 5:
Run your scroll saw blade through the hole, then attach the blade again. Cut out your puzzle piece. I just free handed mine, but if you are going for specific shapes, you could trace the shape onto the picture first to give you a line to follow.

Repeat Step 5 until all of the puzzle pieces are cut out.
Step 6:
Remove any paper that is peeling up, and sand all of the edges

Step 7:
Here is where I will change what I did for the next puzzle. With this puzzle, I taped my final photo to the front, flipped it over and using my exacto knife, I cut the paper pieces out, so they could be glued onto the puzzle pieces. Then I used Mod Podge and to glue the paper to the wood and covered the paper with mod podge to seal the paper on. But that got the paper a little wet and created air bubbles that ended up making a crease in the paper. So what I would do differently is stick a little painters tape around the edge of the wood panel, spray more spray adhesive onto the wood panel, then stick my photo on, then cut the piece out. I didn't have any problems with using the Mod Podge to glue the smaller pieces onto the wood, just with the main puzzle part. So do it whatever way you feel more comfortable doing it, I think either way would work.

Step 8:
Once everything is all Mod Podged together, get your second piece of paneling. Using wood glue, glue the 2 pieces together and set something heavy on top of the puzzle. Make sure your heavy thing covers the whole puzzle or else you might have a gap inbetween the 2 pieces. Let the glue dry.

Step 9:
Sand down the edges and round the corners (don't want any accidents with pointy corners). I used my orbital sander for this, makes it go a little faster : )
Step 10:
Decorate the edges- you can leave it just wood if you want. If you do paint the wood, make sure you seal the paint with either more Mod Podge, or some clear spraypaint for sealing crafts.
Step 11:
Play with the puzzle with your kids! My daughter has had so much fun playing with her aunts, grandparents, friends, and cousins : )

Friday, January 20, 2012
The Mason Update
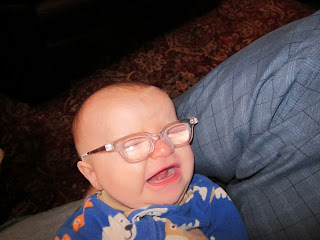
We always thought Mason's eyes weren't acting quite right, but just thought he was a new baby and didn't have much control of his eyes. But when we were in Seattle for Christmas we found out he had cataracts. We first thought it was only in one eye, but found out later that he had congenital cataracts in both eyes. We were able to get an appointment at Primary Children's Hospital on Jan. 9th and the doctor told us he needed surgery ASAP because the brain would eventually give up and shut down that part of the brain. His first surgery was on the right eye on the 11th and then the left eye was done on the 20th. Both surgeries went really well. The doctor said that the second one was much more difficult and it took longer, but he said he got it and it turned out perfectly. When we took his patch off after his first surgery we immediately noticed a difference in his eyes. His eyes stopped bouncing and whipping back and forth. In between the surgeries we went into another doctor and had Mason fitted for hard contacts. He HATES his contacts! We will have to slowly get him used to those, and during that time he has a pair of glasses to wear. We were able to get a loaner pair until his real glasses come in. He looks pretty silly in his coke bottle glasses haha. We are just so grateful for the advances in medicine so that our little man can go through life with sight. We are so grateful for everyone keeping him and us in their prayers.


Subscribe to:
Posts (Atom)